Sunday, February 1, 2015

Our Creative Corner February Challenge–TIC TAC TOE


Hi there guys – this month the TIC TAC TOE challenge over at Our Creative Corner is hosted by the lovely Julia of Julia's Stuff. 
(You can find the challenge rules by going straight over to Our Creative Corner February Challenge) or you can find a quick summary below if you too want to enter the challenge.  There are prizes to be won – there is also a lucky draw for all those who enter in addition to a top-talent prize and 3 runners up - all of whom will receive awesome goodies from our generous sponsor


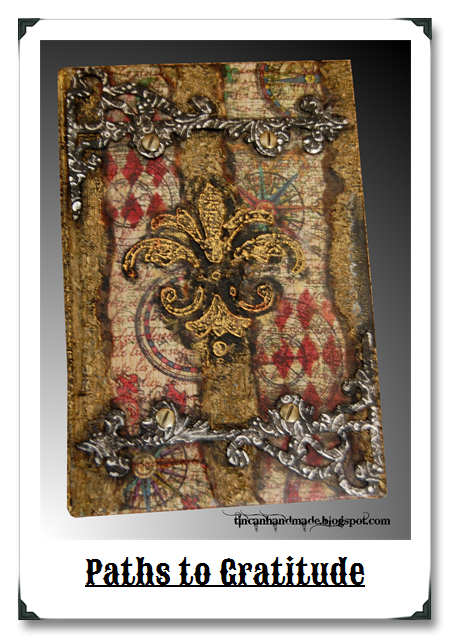
I created this as my Design Team Submission.  My choice was Metal, Stamps and Medium. 
CHALLENGE
“Here is what you have to do, from the grid below - please choose one line from the grid shown. This can be a horizontal, vertical or diagonal line but you must select the middle square as one of your choices. What you make is your choice but please ensure that the three items you have chosen are clearly visible on your make. Please state in your post which line you have chosen. Inks, stains, sprays etc can be used as necessary on your project.”
tictactoepic
- CONFESSION – It took me a while to get that this was not just like playing noughts and crosses but that there were only four combinations.  I am going to list them here so if you too want to create along, to save yourself from accidentally choosing a random line like I originally did.
These are the combinations:
Diagonal 1– Metal, Stamps, Mediums
Diagonal 2 - Embossing Powder, Stamps, Cord
Horizontal – Paints, Stamps, Stencils
Vertical – Die-cuts, Stamps, Embossing Folders
________________________________________________________________________________
Here is a quick In-the-Making type photo show of my project
DSC_0410DSC_0411DSC_0412DSC_0413DSC_0422DSC_0425DSC_0423DSC_0426DSC_0427DSC_0428DSC_0436DSC_0463e1DSC_0466


Monday, January 19, 2015

QUIRKY VALENTINES for February

So February being just around the corner and Valentines Day being the big event for the month and all, I created a set of 6 quirky valentines cards focusing on 4 elements - Metal, Stamping, Die-cuts and Embossing. Here is a quick overall snapshot of all. 


Feb Quirk ed


Now I am going to show you each of the cards all up close and personal and write a little description of how I included the stamps, metal, die-cuts and embossing powder in these quirky little Valentines Cards.


DSC_0378


METAL: Brads and  Lab tubes. To make the bottles look like a lab set, I shaped black craft wire into a system of lab tubes and raised the bottles/beakers on foam tape.
DIE CUTS / EMBOSSING POWDER: Tim Holtz Apothecary Bottles die-cut out of Ranger Shrink Plastic, Heat-Shrunk and dipped in melted UTEE (Ultra Thick Embossing Enamel). Provocraft Books and Apple Die


STAMPS:  Santoro Gorjuss New Heights Stamp (I drew in a different face though).I shadow stamped the blue-printy image from the Tim Holtz Steampunk Collection so that I had faint formula-esque background.


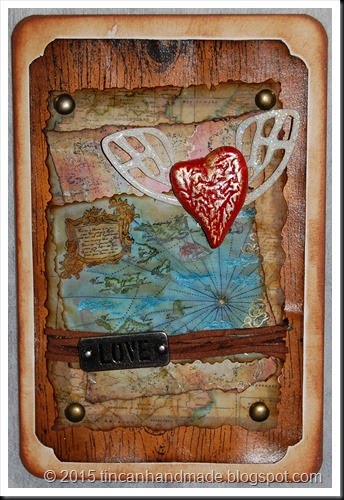
DSC_0364

METAL: Junkyard Findings Jeans Plate and Metal Brads
DIE-CUT: Tim Holtz Fanciful Flight (Bottom wing)
EMBOSSING POWDER:  I mixed a bit of iridescent glitter into some UTEE that I ground up finer in an old coffee Grinder and made sparkly embossing powder.  I coated the wings in that and het set. 
STAMPING:  Wood grain stamp from Heidi Swapp, Cartographer from (Prima??), various other Map stamps.

DSC_0372


METAL:  I made some metal embellishments by twisting thick gauge wire into shapes and hammering it flat (cos I’m wild like that!).  I made all the grungy scratches with ridged flat-pliers.
DIE-CUTS:  the “Wild Thang” sentiment was cut from the Tim Holtz Chip Block Strip-Die, the little heart die-cuts were from the Sizzix Movers and Shapers.
EMBOSSING POWDER:  the background is actually an embossing folder from the Provocraft line which I inked up with a pigment based dye-pad (CHISWICK), I then ran that through the Cuttlebug and then coated it in Ranger Fine Embossing powder so that it stuck to the inked debossed bits and heat-set.  I also stamped the border of the card with one of the branches and fossil leaves stamp set  from  Inkadinkado. I stamped the teeny hearts with a music score stamp that I got ages ago and dont know who makes it.


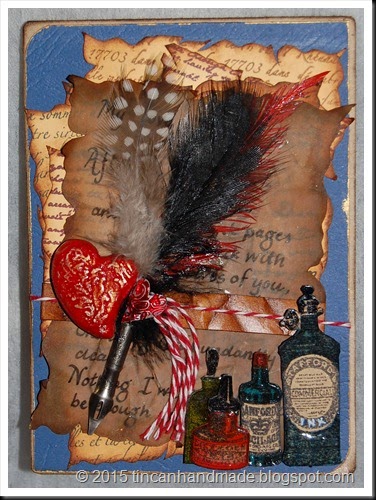
DSC_0363

METAL:  Pen Nib Tim Holtz Alterations
DIE-CUT: Tiny Heart Sizzix Movers & Shapers, Bottles (not technically a die-cut as much as it was a fussy-cut.
EMBOSSING POWDER: I used a Ranger Embossing pen to selectively mark and fill-in the areas that I wanted to be all glossy and glass-like on the bottles, I then coated that in UTEE ( I LOVE UTEE), the bottles started to look glass-like after about 3 coats of UTEE.  You have to do this on low heat though to get it to look glassy but without it bubbling and burning.
STAMPING:  the “letters” are all stamped in various background text stamps.  The Bottles were all stamps as well.


DSC_0379


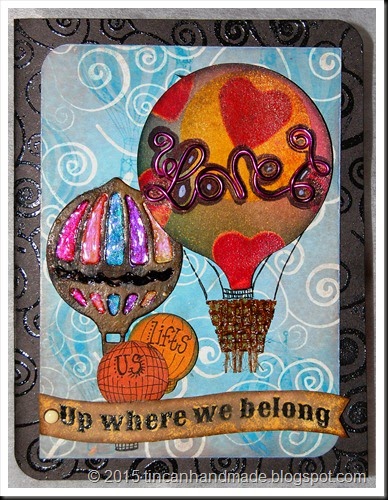
METAL:  I shaped pink craft wire into the Love Sentiment. Metal Brad on the banner.
DIE-CUT:  the hot-air Balloons are cut from X-CUT Build-a-scene Hot Air Balloons and the teeny balloons are actually ornament dies from provocraft.
EMBOSSING POWDER: I made some homemade pearly coloured embossing powders by mixing in crushed eyeshadow (YUP, that’s right eyeshadow!!!) into UTEE. I used an embossing pen from Ranger to fill in the sections of the balloon and used the homemade Pearly EP to add colour to the little balloon.  I stamped the background card with the swirl set from Chiswick and used clear EP to create a tone-on-tone effect.
STAMPING: I first stamped the “sky” background with the swirl from Chiswick in watermark ink on stamping paper. It created a nice resist.  I then stamped all over that with  the Hot-Air Balloon stamp (from Inkadinkado I think, the set with the blimp etc).  I added more blue tones to the sky with distress ink in Broken China, Milled Lavender and Tumbled Glass.  The Swirl on the background card that I mentioned above is stamped in Clear Embossing Ink.

DSC_0385

METAL:  Brads DIE-CUT:  Ornate Label 2-die-for, the “hide” die is a self-design and cut with my plotter.
EMBOSSING POWDER:  I covered the entire hide in embossing ink using the Ranger Emboss It Dauber.  I coated it in Fine Clear Embossing Powder and then did an Iron-off technique to take the glossiness down a tad. I made the hide look like leather this way
STAMPING:  I stamped the heart in a zebra pattern (cant really see it behind the jute bow there in this picture). I did the ol’ ink up your embossing folder stamping trick again to create the black and white zebra pattern.  I also stamped random leaf, twig and and map designs on the background card.


Thursday, January 1, 2015

STRING, LIGHTS, ALCHEMY!!!! - Our Creative Corner January 2014 production -


I am still celebrating having made the design team over at OUR CREATIVE CORNER for this year and I am so amped (pun intended) to present a little tutorial for my stringform lamp project that I created for the January 2014 challenge.

Untitled


If you haven’t already come from there – why don’t you click the image on the right to browse through the creatively diverse projects created by my fellow Our Creative Corner banneruber-talented teamies, you will also be able to see the challenge entries created by the readers themselves.  
The Challenge this month is hosted by Pamellia of my little craft things and this is what she says: 
"With the holidays merely a shadow behind us, my guess is you still have bits of Christmas leftovers stashed everywhere, not to mention bags of Christmas bits meant for the recycle bin. I am a hoarder of all things I think I might get around to using one day, and Holiday bits are no exception! Every closet, drawer and cupboard is overflowing with the little things I collected throughout the holidays. Things I think I might use and things heading to the curb.
Christmas wrapping, gift bags, tinsel, ribbon, gift boxes, tissue paper, Christmas crackers, wine boxes, empty gift wrap rolls, Christmas cookie tins, even the images from the fronts of cards I received...you name, I hoard it!
Let's put those bits to good use this month!
With that in mind, for my introductory challenge theme, I have chosen........
CHRISTMAS LEFTOVERS
To be clear, your project does NOT have to have a Christmas theme, I only want you to recycle your Christmas scraps.
If it's not obvious what Christmas leftovers you used, make sure to tell us about it, somewhere in your post."
And there you have it.  There are prizes to be won sponsored generously by http://nicecranedesigns.com/, so be sure to get in on this action and make your own project, if creating something is not reward enough.  If you still want to stay on this page, dont worry clicking the image will open the link in another window. 


Find the tutorial for the string form lamp underneath this banner.


For this project you are going to need the following raw supplies:
*Cotton Twine or String – the amount depends on how much you want to wrap around your object.
*White Glue,
*Plaster of Paris or Casting Stone Powder,
*Water,
*Paint, Dye or Ink.
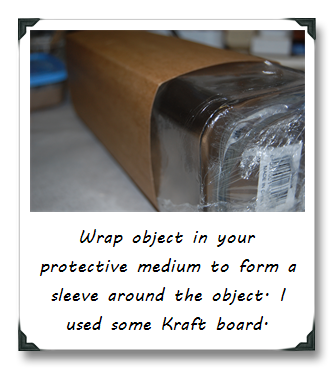
* A protective medium like newsprint or lightweight packing cardboard,
*Clingfilm. 
*An long, rectangular object like a spaghetti jar or a rectangular vase. 
*Some bits and bobs or 
*Wrapping paper to make the Embellishments,
*UTEE (Ultra Thick Embossing Enamel),
*Glossy accents or Dala Polyurethane Hard Varnish to seal the embellishments. 
*Wire (if you are going to make Wire do-dahs).

STEP ONE
Gather supplies.


STEP TWO


STEP THREE
Cover your work surface in plastic wrap and then newspaper – this project is MESSSSSSSSYYYYY.  Put on some gloves as well.


STEP FOUR
When your string thing is dry to the touch and firm against pressure – you may begin the unmoulding process.
  • This however takes some creative figuring out.  Take a strong scissors and evenly cut away the top or mouth of your wrapped object.
  • Using firm but gentle pressure, pull the inner object (the glass jar) out of the sleeve covering it first!  You are going to have to wiggle this one out.  Be patient – it eventually gives and slides out
  • Using a chopstick or pencil – gently push the the sleeve towards the centre and pull out through the mouth you just cut. If you didnt cover the sleeve in cling film, the glue would’ve stuck to the sleeve and that would have been a mission to tidy up all the ripped pieces attached to the string form.
  • Pull away the Clingfilm from the String Form.

WHAT NOT TO DO.

  • I initially covered the jar in Clingfilm, then sleeved, then clingwrapped again.  This made pulling the jar out near impossible. The inner layer of clingfilm just kinda bunched up and resisted the pulling force.
  • I had to pour loads of talc in between the inner film and the sleeve to get it out eventually, and so my moulded string form got covered in talc as well…
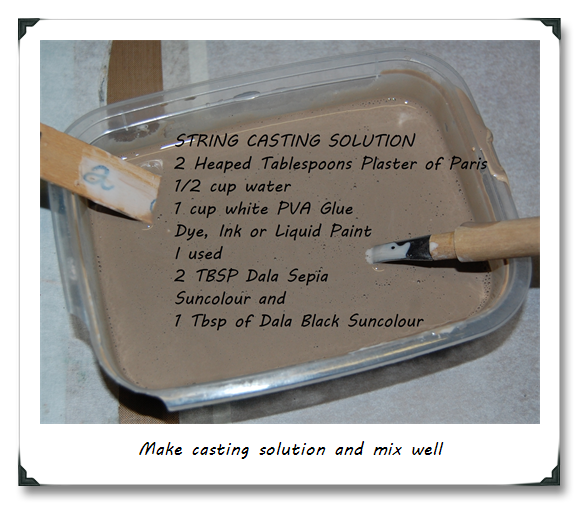
I solved this snag, by dusting off as much as I could with a soft paintbrush.  I then soaked the same brush in 2 parts Sepia, 1 part Black, 0.5 part white Dala suncolour and brushed that over all the spots that were still covered in talc ash.  I let that dry and my problem was solved.

STEP FIVE

lampday
lampdayYou can now add embellishemts to the outside of the string form if you want. 
I made some paper beads from leftover wrapping paper. I dipped those in melted Ultra Thick Embossing Enamel to get that glassy effect.  I also had some glass beads on hand. 
I made a few curly wire forms and threaded the beads onto that and attached the embellishments to the outside of the lamp. 
daylamp


STEP SIX


DSC_0328Get those Fairy Lights that are tangled beyond help, and stuff them into the String Form, making sure that they fill the whole form from top to bottom.
You can do what I did and had a few bulbs sticking out through the little spaces between the string wraps.
Plug in and love your new decor piece and tell everyone you made it all by yourself!!

Let me know whether you liked this tutorial and whether you were able to make one yourself in the comments below or even better on the January Challenge Post over at OUR CREATIVE CORNER
You also are going to adore all the gorgeous little goodies on offer by the sponsor for the month - here is a link to nicecranedesigns 
~hugs, light and love~
Candice (aka Tincan)

Sunday, December 28, 2014

I made the Design Team on a rad Craft challenge blog and other Hot Air Balloons…..


Can you see that twinkle in my eyes????
I am so super excited. 
WOOOOOOHOOOOOOOO!!!!

Please take our badge for your blogI have been asked to join the Design Team for Our Creative Corner. 

Our Creative Corner is a design and craft challenge blog where your creative expression is unlimited in terms of what you create.  Readers are invited to take  inspiration from the creative process of an Internationally diverse (Canadian, Slovenian, French, South African ~me~, English and American) design team. Each Month, a challenge theme is hosted by one of the design team and readers are then invited to contribute their own interpretation or inspirations. 

From the Readers creative contributions, the best creative entry as well as 3 Top mentions will be chosen and will be gifted with some awesome crafty supplies from fantastic sponsors.  There is also a random draw where a random creator can win some more stuff.  There are sponsor spotlights – where the design team has a go at showcasing some of the cool products from our sponsors – and even then – readers are invited to contribute their creative interpretations and a randomly drawn winner will receive some prize goodies from that sponsor.  The Calendar for each month is as follows:

OUR CREATIVE CORNER CALENDAR

1st - Challenge issued
4th - Sponsor Spotlight
8th - Winner announced
11th - Surprise Guest Designer
18th - Sponsor Spotlight
22nd - Top Talent
25th - Sponsor Spotlight

Its all so exciting! I am so darn well stoked to have been asked to be on this amazing design team.

To celebrate my induction into the OCC fold – I decided to do an upcycle project.
Picture1

(THIS CRAFT CHALLENGE BLOG JUST LETS YOU GO WILD IN YOUR CREATIVITY)

I like hangy things – and I have a thing for Hot Air Balloons.  I think they are perfectly whimsical.  So I decided to update the mobile efforts in my home and made some Hot Air Balloons from old lightbulbs, Christmas Tree Baubles, string, pegs and paint and ink.

Super cute huh?
Here is a very simple tutorial on how you can do that too!
You need this:
HOW TO:
  • I used Distress Paint to paint the big baubles in the accent colours that would match the colour palette I have going in my lounge.  I used Dala Glass Glaze (but I think you could use Ranger alcohol ink as well), to stain the light bulbs.  I didnt bother hollowing them out because I wanted the fitting on the end so that I could make that into a basket.  Leave that to dry thoroughly.
  • While that is drying you can start to work on making the easy-peasy macrame string wrap.  This is easier than it looks.
  • You are going to to need 4 to 6 pieces of equal length string. When the string is folded in half or doubled, it should be long enough to be twice the length of your “balloon” .  If you plan on attaching the basket of the balloon to the same string wrap, make it a little longer.
  • Get a small loop or ring of something. Thread each piece of string through the loop or ring so that it doubles over on itself and the tie it off with a love-knot.  For the purpose of showing you what I mean – I am using a curtain ring and red cord, but for my project, I used a beading jump ring and cotton string (or twine)
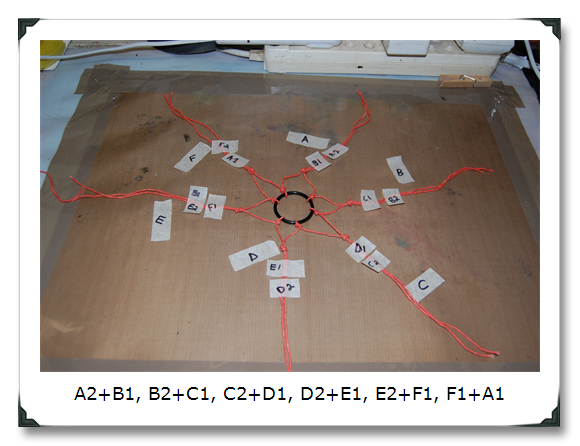
  • The next step is to join the adjacent tails of each set in a knot so that it makes a diamond shape – so it should go like this
  • First row:
  • The second row is done by joining the original set of strings back together. So A1 + A2,  B1+B2, C1+C2,  D1+D2,  E1+E2,  F1+F2 must all join back up together so that you have a another concentric row of diamonds. 
  • And for third, fourth, fifth, sixth, however many concentric rows – you just alternate between joining the adjacent strings (ie - A2+B1, B2+C1, C2+D1, D2+E1, E2+F1, F1+A1) and then bringing the string set siblings back together again for the next concentric row (ie - A1 + A2, B1+B2, C1+C2, D1+D2, E1+E2, F1+F2 ).  That really is how easy it is to make the string wrap.
  • Slide the String Wrap over the bauble or the Lightbulb and wiggle it around until its nice and centred and snug.
DSC_0224

  • To make the basket, for the big Baubles, cut a small piece of toilet paper inner tube down to size.  Take apart about 6 pegs so that you have 12 pieces of peg legs.  Glue those on to the inner tube.  To make it stay fast – you can secure it with a rubber band – like this:
DSC_0225DSC_0227
  • Attach the “basket” to the String wrapped Balloon.  My mom and dad came over for a visit and I got them to be props for me to show you this.
DSC_0229 
  • If you want to you can use a dye-spray to add a little more colouring and distressing to the whole balloon like I did.  But they look just as cute uncoloured I think.  For the lightbulbs – I just wrapped jute cord around the base of the lightbulb and added some beads for interest.
DSC_0296crp
  • Final Product Drying:
DSC_0301

So there you go – be sure to go on over to Our Creative Corner and  check out the amazing projects the other Design Team members have come up up with leave a comment here or there if you liked this tutorial. 
See you soon
Tincan (Candice) Crafter