
I am still celebrating having made the design team over at OUR CREATIVE CORNER for this year and I am so amped (pun intended) to present a little tutorial for my stringform lamp project that I created for the January 2014 challenge.

If you haven’t already come from there – why don’t you click the image on the right to browse through the creatively diverse projects created by my fellow
 uber-talented teamies, you will also be able to see the challenge entries created by the readers themselves.
 The Challenge this month is hosted by Pamellia of my little craft things and this is what she says:
"With the holidays merely a shadow behind us, my guess is you still have bits of Christmas leftovers stashed everywhere, not to mention bags of Christmas bits meant for the recycle bin. I am a hoarder of all things I think I might get around to using one day, and Holiday bits are no exception! Every closet, drawer and cupboard is overflowing with the little things I collected throughout the holidays. Things I think I might use and things heading to the curb.
Christmas wrapping, gift bags, tinsel, ribbon, gift boxes, tissue paper, Christmas crackers, wine boxes, empty gift wrap rolls, Christmas cookie tins, even the images from the fronts of cards I received...you name, I hoard it!
Let's put those bits to good use this month!
With that in mind, for my introductory challenge theme, I have chosen........
CHRISTMAS LEFTOVERS
To be clear, your project does NOT have to have a Christmas theme, I only want you to recycle your Christmas scraps.
If it's not obvious what Christmas leftovers you used, make sure to tell us about it, somewhere in your post."And there you have it. There are prizes to be won sponsored generously by http://nicecranedesigns.com/, so be sure to get in on this action and make your own project, if creating something is not reward enough. If you still want to stay on this page, dont worry clicking the image will open the link in another window.
Find the tutorial for the string form lamp underneath this banner.

For this project you are going to need the following raw supplies:
*Cotton Twine or String – the amount depends on how much you want to wrap around your object.
*White Glue,
*Plaster of Paris or Casting Stone Powder,
*Water,
*Paint, Dye or Ink.
* A protective medium like newsprint or lightweight packing cardboard,
*Clingfilm.
*An long, rectangular object like a spaghetti jar or a rectangular vase.
*Some bits and bobs or
*Wrapping paper to make the Embellishments,
*UTEE (Ultra Thick Embossing Enamel),
*Glossy accents or Dala Polyurethane Hard Varnish to seal the embellishments.
*Wire (if you are going to make Wire do-dahs).
STEP ONE
Gather supplies.

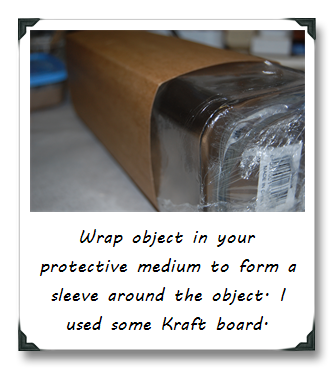

STEP TWO
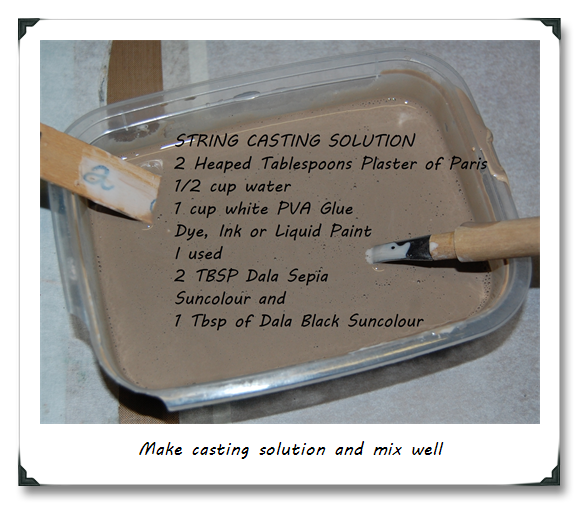

STEP THREE
Cover your work surface in plastic wrap and then newspaper – this project is MESSSSSSSSYYYYY. Put on some gloves as well.


STEP FOUR
When your string thing is dry to the touch and firm against pressure – you may begin the unmoulding process.
- This however takes some creative figuring out. Take a strong scissors and evenly cut away the top or mouth of your wrapped object.
- Using firm but gentle pressure, pull the inner object (the glass jar) out of the sleeve covering it first! You are going to have to wiggle this one out. Be patient – it eventually gives and slides out
- Using a chopstick or pencil – gently push the the sleeve towards the centre and pull out through the mouth you just cut. If you didnt cover the sleeve in cling film, the glue would’ve stuck to the sleeve and that would have been a mission to tidy up all the ripped pieces attached to the string form.
- Pull away the Clingfilm from the String Form.
WHAT NOT TO DO.
- I initially covered the jar in Clingfilm, then sleeved, then clingwrapped again. This made pulling the jar out near impossible. The inner layer of clingfilm just kinda bunched up and resisted the pulling force.
- I had to pour loads of talc in between the inner film and the sleeve to get it out eventually, and so my moulded string form got covered in talc as well…
I solved this snag, by dusting off as much as I could with a soft paintbrush. I then soaked the same brush in 2 parts Sepia, 1 part Black, 0.5 part white Dala suncolour and brushed that over all the spots that were still covered in talc ash. I let that dry and my problem was solved.
STEP FIVE

 You can now add embellishemts to the outside of the string form if you want.
I made some paper beads from leftover wrapping paper. I dipped those in melted Ultra Thick Embossing Enamel to get that glassy effect. I also had some glass beads on hand.
I made a few curly wire forms and threaded the beads onto that and attached the embellishments to the outside of the lamp.


STEP SIX
 Get those Fairy Lights that are tangled beyond help, and stuff them into the String Form, making sure that they fill the whole form from top to bottom.
You can do what I did and had a few bulbs sticking out through the little spaces between the string wraps.
Plug in and love your new decor piece and tell everyone you made it all by yourself!!
Let me know whether you liked this tutorial and whether you were able to make one yourself in the comments below or even better on the January Challenge Post over at OUR CREATIVE CORNER
You also are going to adore all the gorgeous little goodies on offer by the sponsor for the month - here is a link to nicecranedesigns
You also are going to adore all the gorgeous little goodies on offer by the sponsor for the month - here is a link to nicecranedesigns
~hugs, light and love~
Candice (aka Tincan)


Wow Candice, it looks great! I love the recipe for the string casting. The beads are fun and a great addition x
ReplyDeleteI have done this with a balloon. That way you just pop it and it is easy to get out! Great tut!
ReplyDeleteWhat an absolutely gorgeous project Candice! Congrats (again) on joining OCC and wishing you a very Happy New Year! Anne xx
ReplyDeleteThis is just soooo utterly brilliant, Candice!
ReplyDeleteI might well give this one a try myself (because I love lamps, this kind of imaginative crafting AND getting messy). Although the danger of "ending up with a tangly gob of sticky redundance" sounds like a real challenge....lol.
Happy New Year to you!
Hugs,
Claudia xxx
Wow Candice! This is spectacular! You are so creative and your tutorial is very well put together! Not that I didn't love your lamp before...but I really love it now!! A great recycle project! Happy New Years hugs from you new teamie :)
ReplyDeleteA wonderful and clever création! The tutorial is very useful and I'm sure I'm going to try one day. Great effect for this lamp !
ReplyDeleteHappy new year Candice !
Great tutorial!! I think I need to try this! Happy New Year my new teamie. Looking forward to your next creations. Thanks for the inspiration. xx Hugs, Laurie
ReplyDeleteI totally LOVE this project Candice!! Making the string container is inspiring and I'd love to have a go at that! I adore fairy lights and putting them in your string container makes them even more gorgeous. Great start to your time at OCC and looks like it will be lots of fun working with you.
ReplyDeleteHappy New Year. Julia x
Wow, cool idea Candice and many thanks for this great inspiration and tutorial! Hugs, Kerstin
ReplyDeleteNot to mention, a big Thank you for your lovely comment on my blog, it makes me happy!
DeleteTotally stunning recycling...I love it and I love beads you added, too!
ReplyDeleteHugs from Slovenia
A fantastically detailed tutorial as always - and another original, creative and inspiring piece of art from you. I love the light shining from within the complex structure of the string - it looks amazing!
ReplyDeleteAlison xx
Hi Candice!! It's taken me a while to catch-up and make it back to my teammate's blogs--but well worth taking the time to read through your steps on this AWESOME creation!! WOWIE, Candice!! What did you say--BTS you were up for 39 hours working on this?! WOWIE--this is just soooo pretty!! OMG--I'm with you that waiting for the string to dry was the hardest part!! I'd probably be fussing and touching and wanting to unmold it way to quickly ;) You've made a fantastic OCC project for the Christmas Leftovers challenge :) You should be very proud of this!! XOXO-Shari
ReplyDeleteReally like your lights and thanks for the tutorial. I can picture these string lights hanging from the trees at our cottage lighting the path to the beach, but I would have to rig them up with battery candle lights as it would be too far for electrical cords. I have bookmarked for a summer "how-to" project!
ReplyDeleteWhat an amazing creation! Love all those gift wrap beads! And thank you for the well done tutorial! This will be on the crafting bucket list, for sure!
ReplyDeleteThe tutorial is fantastic, the completed creation simply amazing. Thank you for sharing this. Jenny x
ReplyDelete