Monday, June 16, 2014

Pigs can fly


002Thought I’d share this really simple card that took only about 10 minutes to make.  It is a trifold or a “Z” card fold.  When you need to make a bunch of different card that are cool but dont take a lot of time, this is a handy go-to design.

You Need:

  • 2 o3 colours of Ink
  • 1 crazy stamp
  • Imagination for the sentiment
  • Calligraphy  or  chisel nibbed  Pen to write the sentiment
  • Contrasting Gel Pen if you want to add more flair to the Letterring
  • Fun button or embellishment

Picture1

Folding INSTRUCTIONS

  • fold A4 sheet into 3 equal sections A, B and C.
  • From the B section, start from about 2/3rd’s from the bottom of the card and start to draw a gentle curve all the way to the opposite edge of about 1/3rd from the bottom of section C
  • Cut away the top portion
  • Fold into a Z Shape

You can also glue down the open edge of the C- section to create a little pocket where you can insert a gift card or trinket.


Friday, June 13, 2014

Tim Holtz 12 Tags of 2014 – June Edition


007Would you believe it – I even managed to get my June tag ready before halfway through the month? 
Ever since I bought a series of Tim Holtz stencils, I have become very attached to them.  I was particularly excited to get started on this tag because it was  about cool stencil effects.  And since I now own a stack of these (Yes they finally arrived in my little dorpie in South Africa), I take every chance I get to bust them out and make up for the long lost time that I had to do without them. The technique this month was deliciously simple but a fabulous watercoloury stencil effect. 

In my last post – I showed you a background I did for the “Follow Your Heart” tag.  What I did was lightly mist the cardstock with water and only ink up the stencil, then I pressed the stencil down onto the wet cardstock.  I like this batik look and I do like the way the die pools up in certain places.
032
The technique Tim demonstrates for the stencil background of his June tag is very similar – except that he inks and mists the stencil and doesnt print on damp cardstock.  His method is so much more vibrant and gives a really lovely blended coverage.  See his tag here:
 DSC00313-3.38.05-PM 
One of the personal goals I set for  myself every month for this particular tag-share is to reinterpret the elements and theme such that it does preserve the technique and theme of the tag while challenging me to be more creative with my style.  I think its fun or like a really cool game to create something within certain boundaries but with the freedom to superimpose my brand of creative urging.
I am going to share a mini step-by-step of how I made this tag which I turned into a card topper.  I am going to try and show exactly what elements I kept and re-interpreted.

instructions0
005.text

014

instructions
instructions2
instructions3

Well there it is then – I kinda had fun doing the pic-torials with the arrows and the text as well.  Until later!


Wednesday, June 11, 2014

Compendium of Curiosities III–Challenge 4


052This is what I was inspired to create as my entry for Challenge 4 – aren’t you proud of me for getting it done before the deadline for the second time in a row?  Anyway – once more – the challenge required us to present our interpretation of the technique listed on Pge 49 of  Compendium of Curiosities Vol 3.  We are requested not to share the technique out of copyright respect to Tim Tim.
I have to admit that this was one of my favourite things that I have crafted this week purely because I used a slew of different Tim Techniques and because I love gears and doll stamps, wire, glossy accents and grunginess.  Personally, I thought it was awesome and I was pleased with the overall outcome. Chairman Mau however says:  “Busy, but pretty”…..

Here are a few close-ups for the seriously interested


Tuesday, June 10, 2014

Selective Frame Embossing–Tips for getting the dents only in the places you want it


027.e026.eI am going to share my new favourite thing to do.  Right kids, hands up if you have become addicted to colourable doll stamps?  Now -other hand up if you suffer from anxiety when you want both the stamp and the embossing pattern to exist on the same piece of paper?  Now raise your right foot if you want the embossed pattern to hug the image and not emboss the image as well.  I am raising all my appendages right now – like an impatient kid in a classroom who’s bursting to win teacher’s approval.

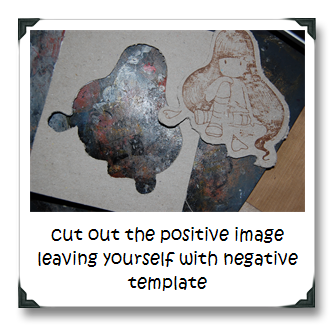
I cant take too much credit for this idea.  I sorta adapted the idea from those selective embossing frames that Ranger sells.  Squares, rectangles and arches are nice and all but I wanted customised frame embossing for my stamps.  I like the texturised backgrounds but I also want the texture not to interfere with the focal point of my card.  So here is the solution that I came up with.

THINGS YOU NEED

  • Book Cover Board or any heavyweight chipboard
  • Awesome Stamp
  • Craft knife or if you have a cutter that will do a print and cut and can cut chipboard – that will make your arthritis miraculously disappear
  • Patience
  • Embossing Folder and Embossing Machine
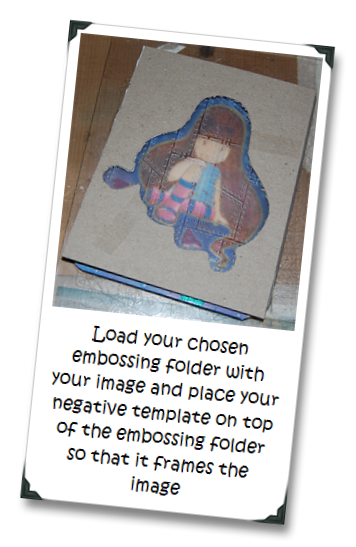
METHOD of MADNESS

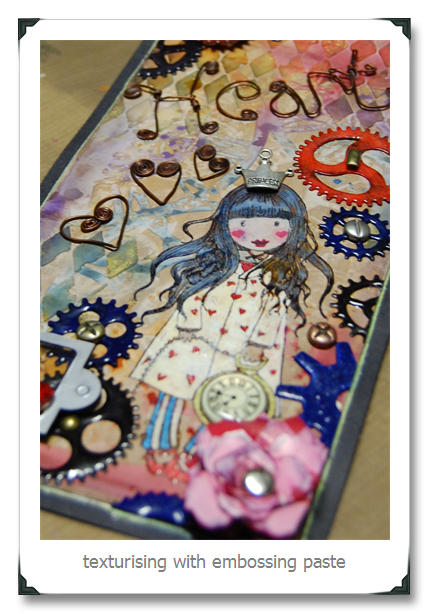
    Use your piece as your awesomely cool card or tag topper!
    I’d love to see what you come up with – if you would like to share it – post a link to your creation in the comments section.