Right so my Tim tag is there on the left. But I cant just make something and not tell you the story of the what and why of it. So guess what you get a little insight into the inner workings and struggles of me today as well. I am a bit of a R.M Drake junkie at the moment. Maybe we attach to the things that we need for our lives in the current space that we are in. I loved this because it spoke to something that I have been struggling to come to grips with. Oddly enough, in the same day that I read this quote – I received an email from my dear old friend Andreas who wrote me an encouragement that read: “Whoever doesn’t appreciate you isn’t worth it. You’re too special to waste your time with anyone who doesn’t carry you in his hands and adores you 24/7.” And then later on in the evening my girl Ashmin, sent me this incredible poster below. I had a good cry over all of it. I needed this.
I am blessed and feel so touched that I have these awesome people in my life who see me and value me and remind me that I have something to offer and that it is good enough. I have really struggled with this recently, as you might remember from a few posts back. I berated myself for not being more like I wasn’t. I desperately sought to become something that would have negated the very essence of who I actually am, because I convinced myself that it would make me more worthy of love and affection. In that space, I have questioned myself, I have wondered whether it was wrong to like who I am, whether it was wrong to be comfortable in my way of life, the ideas that I have, and the way I organise reality. I have wondered if there was something fundamentally wrong with me that despite all my best intentions, offering the best and purest form of love I could possibly give, why that was just not good enough? And why I keep failing at staying in the space of the intention and falling over again and again. Perspicaciously I have begun to sense that throughout a large part of my emotional life, I have just perfected a pattern of falling in love with someone that maybe I unconsciously do know is bad news and who manifests the role of the disembodied voice of my self-scripted diatribe of judgement against myself. There might also be a sense of comfort in familiarity - the predicted outcome of a familiar pattern is known, and there is a sense of security that happens when you know you have been there before, you have survived it. Unknown territory is frightening - even good unknown territory. But Karma is what you create for yourself? As for changing your karma? It is a hard battle to change this pattern of behaviour, to make yourself believe that you are enough, that you are good as you are, that there are those who can see you and love you and accept you for the unique being that you are, when you have become so accustomed to berating yourself. I have become aware that the people that I foolishly loved the most and felt most sore about losing were not the ones that were actually good for me, but the ones that demonstrated the least amount of respect and value for me. When I think about that – I see how ridiculous it is. But I keep returning there. Why do I attach such emotional energy and pain to the ones that were the least honourable? What is this dependence? To create such angst and anxiety about anyone who cannot accept and love you for who you are is a colossal waste of your precious perfection. I have to remind myself that that includes myself, the people outside of myself, as well as the part of me that gravitates towards the people that enable that self-loathing. Because each of us are uniquely perfect and deserve to be loved and valued for that unique perfection, anything less than that does not serve you in the way that you were meant to be served to be the best that you are. And that applies to what I must work toward myself as well as have the strenghth to offer that to whomever I choose to be with. I hope that I can hold true to this promise. Paulo Coelho is one of my favourite authors. I read him up voraciously and with the zealous fervour of a disciple. I religiously read his blog too. I remember reading a post once and being thoroughly surprised at what he was saying. It wasn’t the usual peace, love and happiness stuff that I had expected him to say. I do admit that I even thought that he was not being as guru-like as I was wanting him to be and I didn’t like that. He was talking about how we should not entirely forgive and forget those who visit dishonourable and unnecessary grievances upon us, those who exploit our naive vulnerability and affect, they that toy with our affections and our trust. I was gobsmacked. How could my sage, the lovely Coelho suggest such a thing? Today, I finally understand what he was trying to say. Dont allow anything that dulls your sparkle, and dont agonise over the “tarnishers”, don't make excuses for the people who treat you badly. I get it now. I really, really get it. You are perfect as you are. Anyone who doesn't see that in you and want to keep you close for it is not worth YOU. I want change. I am trying. Its hard but I am trying, and I am going to keep trying. I created something to remind me of this resolve. I also want to celebrate and honour the people that fan the brightest flames of my little life. Out of my great respect for Tim Holtz, whose positive inspiration in my life has brought forth some of the best parts of my personality that I am happy about – the desire to create and love what I create – I made a Tim tag for this June, with a message for us all to embrace….oh yeah and I also borrowed a Meghan Trainor “quote” for it. Just in case you don’t know what or who the fuss Meghan Trainor is – here’s the cute little song I borrowed the quote from.
I have no idea how I produced so many posts but here it is the 100th post for Tincanhandmade.blogspot.com. And since it is the 100th post, I have like a 100 things going on here today. This doesn’t make for the usual bite-sized one idea per post apparently preferred by blogreaders, but it is my 100th post (have I said that enough already?) and I am celebrating by doing a big share of everything that I have been tinkering with. Over the years this blog has changed shape and form a little but I have always tried to maintain a sense of my core personality in it and direct it in a way that somewhere, somehow, someone might glean some kind of inspiration from it. Here I am 100 posts later still as excited about it as the day I set it up, I continue to hope that even if just one something in this blog inspires just one person, my purpose for this blog - the intention to spread love, creativity and my heart that just really loves to love (that includes stuff, people and life)is fulfilled. On that note – the very first thing I want to say is addressed to every one of you who left the most heartening, encouraging and beautiful comments on my “What made me smile and other Fairy-light at the end of the tunnel stories” post. You made my heart lift in ways that can only be described as buoyant. How beautiful to have that kind of support and validation. I am so moved, blessed that you all have taken the time to leave such comforting and reassuring thoughts. I may not have met most of you in person but I do love you all for it. You have reaffirmed my faith in the goodness of the human spirit, you have touched my heart so profoundly. So thank you and thank you with every part of me. Now back to the 100 things going on. Lemme just mention that somewhere hidden in either this post or post video is a “Bosphorus Neo-Zen Tincan Moment” – these “moments” might be worth your while looking out for and taking note of, but that is all I am going to say about it for now……(insert playful, mysterious and excitably curious soundtrack here, in your head ofcourse)
Next up some of the ol’ design inspiration. I had to wait to put this up after Father’s Day cos I wanted to share the card that I made for my daddy. I had so much fun putting this together. I get really stoked when a spark of creativity allows you to re-imagine old stuff and fashion it into something completely different to something you have done before with the same ol’ stuff. I literally saw a vision of it while I was driving back from work (dont you just love when that happens so spontaneously?)and I put the whole thing together in the first 20 minutes after I arrived home. I was so excited I didnt even want to wait to go out and buy all the branded craft stash of steampunky cogs and gearsy bits. Most of the metal bits are paper fasteners, brads and office supply items.
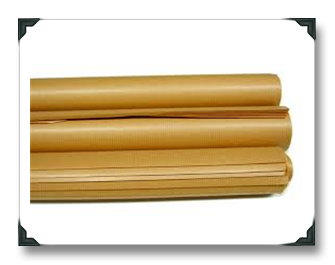
The more obvious gear and and cog shapes were die-cut from an older X-Cut die-set and metallicised with a combination of both Tim Holtz Distress Paint and Dala Metal Craft paint. I cheated a little with the shape of the Steampunk Owl, I was too lazy at the time to design one in Gimp so I fished out the doodle owl from the Kaisercraft Owl Folk collection, stamped it onto some grunge-board and fussy-cut that out, it got a colour treatment with Distress Markers. The twig that he is perched on, is from my garden trash. I used some galvanised steel wire to wire write the “Wise Owl Dad” sentiment on the front. Shaping wire these days makes me oddly satisfied. I kept the inside of the card relatively unfussy (this is sooooooo hard for me, but I think I did it….right?) Now with a cute little owl card you need matching gift packaging right? So guess what I went and did? Created a themed gift package to match the card – I know that’s a little nuts, but that makes me. So as part of the like a 100 things going on for the 100th post I am sharing my tips for creating the perfect gift package for any occasion and for any type of gift. My big winner here is ----------------------Are you ready for it? --------------------------BROWN PAPER!!!!! This stuff is super-cheap, at the beginning of the school year you can get loads and loads for next to nothing.
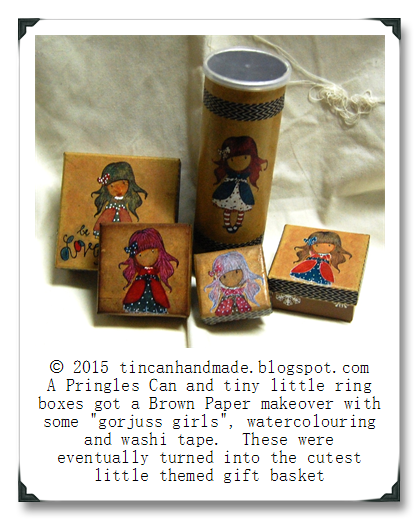
Its neutral, stampable, paintable and you can get practically anything to co-ordinate with it. It is my go-to staple in my stash of supplies and one of the things I would list as a MUST HAVE item if I were to write a list of my choices for things no self-respecting crafter should do without. My mom forbade me from buying dad any more clothes for Father’s Day as his cupboard is protesting. So what I ended up getting for the dad who has everything is get a bunch of random things, some gag, some not so gag, some things that he thinks we dont know that he secretly adores(chocolate)and I packaged them altogether to co-ordinate with the Wise Owl Dad card. Putting this package together was fun. I made the Brown Paper look a little more in-theme by adding a few owl themed embellishments, washi-tape and die-cuts. Do this with anything – all you need is just a few themed accessories and you got yourself a gift package.
The total Gift eventually turned out like this. I stacked everything together in a nice little arrangement and my daddy loved it so much that he didn’t even want to rip the paper off, seriously, he painstakingly the wrapper off each one and then he saved it – bless him, my dad is tops! I have a few other ideas to inspire you on how you can make brown paper wrapping your BFF here below. You look at me skew now, but I do promise, with a little bit of imagination and creative recycling, you will never have to buy gift bags or wrap again, if you keep a big roll of this on hand.
I could go on and post every single pic of some brown-papered thing I have done, there is no limit to what this humble roll can do for you, but I reckon you get the picture.
Those boxes and the like were my cute packaging for a bunch of bespoken accessory requests arising from that Fairy-light bulb charm piece. Who knew that post would get me so going on a productive streak. I decided after making the bespoke pieces that I wanted to freshen up my collection of style a bit. Here are some pieces that I have been working on. I am little bit on the wire trail right now, I have these little obsessions….
If you want to find some cool stuff, do yourself the pleasure of checking them out. You can link directly to the site by clicking on their logo over there on the right or on the flyer picture here, opening the picture in a seperate window will give you store details and a map of how to get there. This place is so awesome – they have some sweet gems, rocks and the like. You can order stuff directly off of their site or you can go over there to their store/museum/gallery in Pietermaritzburg. Some super amazing, friendly people run the place and their prices are so reasonable you will be bedazzling yourself in drapes of mineral and sparkliness.
So as for those boards that my neck and hair wear are mounted on......
I am a self-taught hack at everything, seriously, no formal training in anything skillsy and one of the hardest things I have had to figure out on my own is photography. My biggest issue here is figuring out how to light and compensate for shadow, overexposure, white glare and those weird skewed angles. I really didn’t like balancing my projects on things, it just didn’t sit right and blah blah blah long story short – I needed to make a something that would allow me to mount my projects on something adjustable, it had to be universal for most types of projects I attempt, and it had to allow me to bounce light off something else so that I wouldn’t wind up with overexposed glare or crazy, creepy shadows. I came up with solution that is so darn simple – I have no idea why it didn’t ever occur to me to do this before. And so as usual I cant bridle the teacher in me – so I want to share as a tutorial in this here post number 100, a quick little instructable on how you can make a UNIVERSAL MOUNTING BOARD, like the one I used to mount the Steampunk Owl Card and all the bedazzly thingies, so that you too can mount your paper art and jewellery projects and have them look like they are just there floating on against the background when you want to photograph them. Now you can just go watch the quick linked video version of this tutorial in the video at the top of this post or you can scroll through this below with the tiny picture stills taken from the video. What you are going to need to make this is:
Some kind of stiff board -(my preference are these Dala Artist Canvas Panels – they are quite solid and don’t warp so much when you apply glue to them – they are also cheaper than plywood or MDF)
Strong glue - (I’ve done this with regular white wood glue but I prefer using Dala Stencil Glue now because it is super tacky and if you apply, leave it to set without sticking anything to it – you get yourself a repositionable tacky finish. For the back I use a stronger glue – in this case “Mount it – No Nails”, another higher-end brand of this product is called “No More Nails”. This is a white paste that has the texture of tiling grout, has a superior bond strength of note and literally sticks stuff together in 10 seconds
Some loose weave fabric like Hessian/Burlap - (I suppose the loose weave part is not that urgent, but I think the looser the weave is more forgiving – you will see why later.)
A drill or an book binding awl or just a very sharp, pointy, poky thing
Some nylon fishing gut - I think this might also be called invisible thread in craft and haberdashery places, I bypass those places and go for the hard catch-a-shark type of invisible nylon cord, you get a reel of 50metres or so for the price that a metre of that would set you back at a specialised sew-shop.
Bulldog Clips if you want to get fancy-schmancy but these are not necessary and just an option if you want to get super deluxe cute.
PROCESS
Choose the size of mounting board you need. I have made them in different sizes for different sized items and backgrounds
Measure the amount if Hessian you are going to need to adequately cover the whole board with some overhang to tuck behind it, so that you have a neater finish. Cut the fabric accordingly.
Cover the whole front of the board with a layer of strong glue, in my case I used Dala Stencil Glue. This is a very strong glue with high tack strength, if you leave it to set for about 5 to 7 minutes, it behaves like a really tacky repositionable glue.
Once the the glue has set, lay the sticky side down onto your precut hessian piece. Turn over and smooth out.
If you want relatively neat corners, fold the edges of the hessian overhang over the corner of the board to make triangles with the apex of the triangle taut over the right angle of the corner edges of the board. Glue in place. I use a heavy mount, quick setting glue for this (Mount It or No More Nails), a hot glue gun might work just as well though.Cut slits into the Fabric on either side of the triangles such that when you flatten it out again it looks like a fat cross or plus sign.Fold these over and glue in place.
Mark the centre and mark where you want your holes to be. My general rule of thumb for this is to imagine where your biggest paper piece or card will sit and mark holes about a millimetre round that. It is up to you how many lines of thread you want to secure your project to the board. I usually only need two to six paralell lines.If you want to use the same board to mount jewellery project, do the same and mark your holes for that.
Using an awl or a Dremel – pierce right until it pokes through at where your marks are.
Use your invisible thread or fishing line to make taut lines and tie off to finish – or you may just want to cut a longer piece of line so that you have some give on the line for bulkier projects and secure it at the back with bulldog clips.

 received an email from my dear old friend Andreas who wrote me an encouragement that read:

 I have become aware that the people that I foolishly loved the most and felt most sore about losing were not the ones that were actually good for me, but the ones that demonstrated the least amount of respect and value for me. When I think about that – I see how ridiculous it is. But I keep returning there. Why do I attach such emotional energy and pain to the ones that were the least honourable? What is this dependence?
 about how we should not entirely forgive and forget those who visit dishonourable and unnecessary grievances upon us, those who exploit our naive vulnerability and affect, they that toy with our affections and our trust.
  I created something to remind me of this resolve. I also want to celebrate and honour the people that fan the brightest flames of my little life.

")


")


")
e")
egood")
")


