 |
| Can you see that twinkle in my eyes???? |
I am so super excited.
WOOOOOOHOOOOOOOO!!!!
 I have been asked to join the Design Team for Our Creative Corner.
Our Creative Corner is a design and craft challenge blog where your creative expression is unlimited in terms of what you create. Readers are invited to take inspiration from the creative process of an Internationally diverse (Canadian, Slovenian, French, South African ~me~, English and American) design team. Each Month, a challenge theme is hosted by one of the design team and readers are then invited to contribute their own interpretation or inspirations.
From the Readers creative contributions, the best creative entry as well as 3 Top mentions will be chosen and will be gifted with some awesome crafty supplies from fantastic sponsors. There is also a random draw where a random creator can win some more stuff. There are sponsor spotlights – where the design team has a go at showcasing some of the cool products from our sponsors – and even then – readers are invited to contribute their creative interpretations and a randomly drawn winner will receive some prize goodies from that sponsor. The Calendar for each month is as follows:
OUR CREATIVE CORNER CALENDAR
1st - Challenge issued
4th - Sponsor Spotlight
8th - Winner announced
11th - Surprise Guest Designer
18th - Sponsor Spotlight
22nd - Top Talent
25th - Sponsor Spotlight
4th - Sponsor Spotlight
8th - Winner announced
11th - Surprise Guest Designer
18th - Sponsor Spotlight
22nd - Top Talent
25th - Sponsor Spotlight
Its all so exciting! I am so darn well stoked to have been asked to be on this amazing design team.
To celebrate my induction into the OCC fold – I decided to do an upcycle project.

(THIS CRAFT CHALLENGE BLOG JUST LETS YOU GO WILD IN YOUR CREATIVITY)
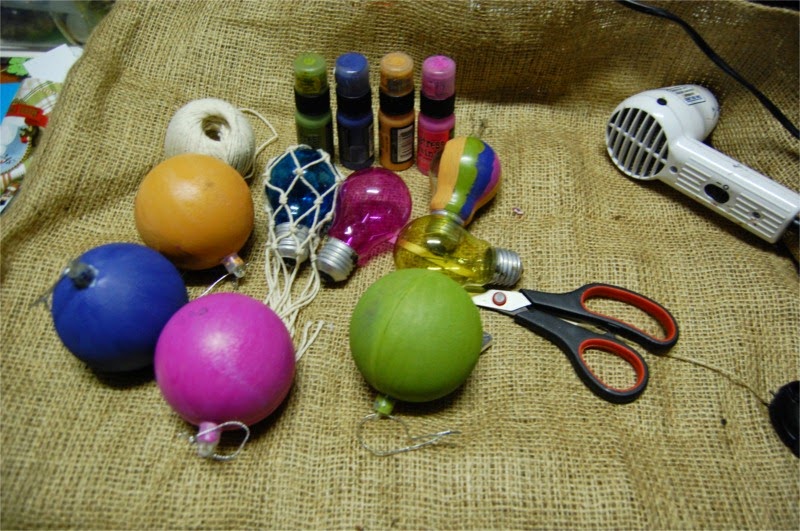
I like hangy things – and I have a thing for Hot Air Balloons. I think they are perfectly whimsical. So I decided to update the mobile efforts in my home and made some Hot Air Balloons from old lightbulbs, Christmas Tree Baubles, string, pegs and paint and ink.
Super cute huh?
Here is a very simple tutorial on how you can do that too!
You need this:
HOW TO:
- I used Distress Paint to paint the big baubles in the accent colours that would match the colour palette I have going in my lounge. I used Dala Glass Glaze (but I think you could use Ranger alcohol ink as well), to stain the light bulbs. I didnt bother hollowing them out because I wanted the fitting on the end so that I could make that into a basket. Leave that to dry thoroughly.
- While that is drying you can start to work on making the easy-peasy macrame string wrap. This is easier than it looks.
- You are going to to need 4 to 6 pieces of equal length string. When the string is folded in half or doubled, it should be long enough to be twice the length of your “balloon” . If you plan on attaching the basket of the balloon to the same string wrap, make it a little longer.
- Get a small loop or ring of something. Thread each piece of string through the loop or ring so that it doubles over on itself and the tie it off with a love-knot. For the purpose of showing you what I mean – I am using a curtain ring and red cord, but for my project, I used a beading jump ring and cotton string (or twine)

- The next step is to join the adjacent tails of each set in a knot so that it makes a diamond shape – so it should go like this
- First row:
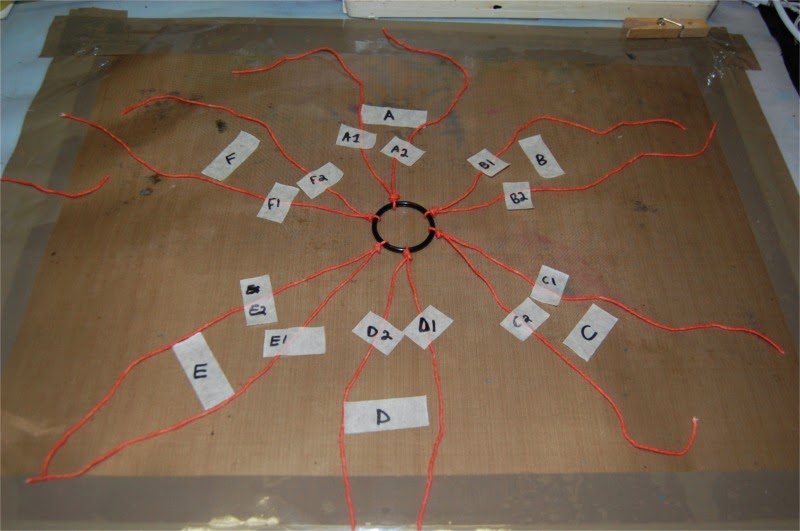
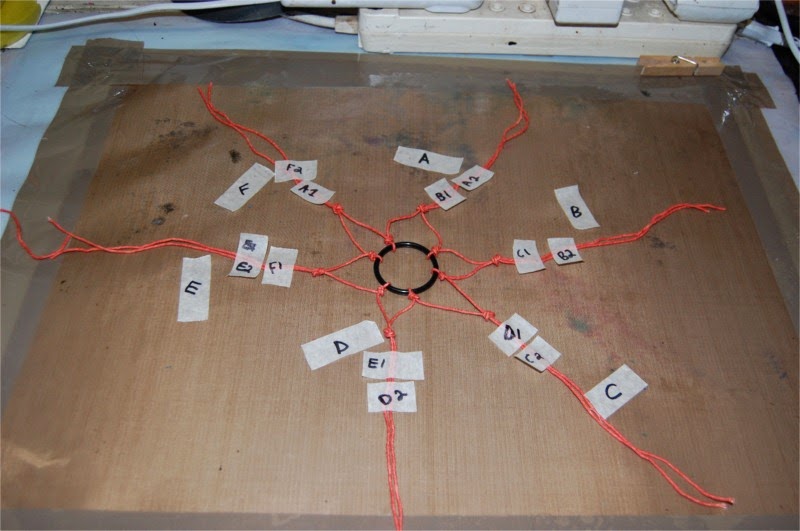
- The second row is done by joining the original set of strings back together. So A1 + A2, B1+B2, C1+C2, D1+D2, E1+E2, F1+F2 must all join back up together so that you have a another concentric row of diamonds.

- And for third, fourth, fifth, sixth, however many concentric rows – you just alternate between joining the adjacent strings (ie - A2+B1, B2+C1, C2+D1, D2+E1, E2+F1, F1+A1) and then bringing the string set siblings back together again for the next concentric row (ie - A1 + A2, B1+B2, C1+C2, D1+D2, E1+E2, F1+F2 ). That really is how easy it is to make the string wrap.
- Slide the String Wrap over the bauble or the Lightbulb and wiggle it around until its nice and centred and snug.
 |
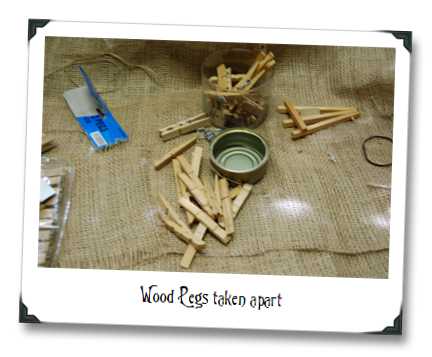
- To make the basket, for the big Baubles, cut a small piece of toilet paper inner tube down to size. Take apart about 6 pegs so that you have 12 pieces of peg legs. Glue those on to the inner tube. To make it stay fast – you can secure it with a rubber band – like this:


- Attach the “basket” to the String wrapped Balloon. My mom and dad came over for a visit and I got them to be props for me to show you this.

- If you want to you can use a dye-spray to add a little more colouring and distressing to the whole balloon like I did. But they look just as cute uncoloured I think. For the lightbulbs – I just wrapped jute cord around the base of the lightbulb and added some beads for interest.

- Final Product Drying:

So there you go – be sure to go on over to Our Creative Corner and check out the amazing projects the other Design Team members have come up up with leave a comment here or there if you liked this tutorial.
See you soon
Tincan (Candice) Crafter


